Just a short post today and it regards a tip for 3D Adaptive. The problem is that while cutting a 1.5″ hole into an SS block you get a lot of unneeded vertical moves.

Here are the default settings from HSM on the relevant page for this post.
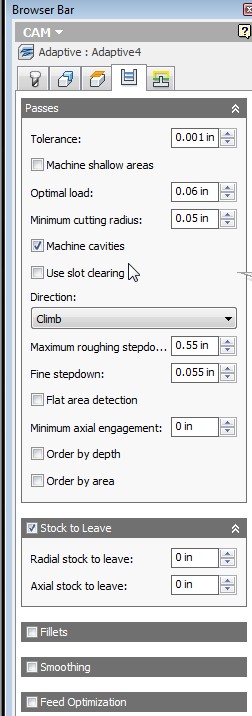
The .055 stepdowns are the problem here with this particular tool path. You will find that the tool path struggles to make sense of the .055 step-downs where none are possible so you get these weird sewing machine vertical moves as a result. These can by the way show up in your finish and can be a problem. When you are cutting and removing metal fast you generate deflection and these little jaggies do not have that problems. The end result is they will cut past the roughing cut surface. So you either remove the sewing machine by eliminating them or do a finish profile or ramp down cut to remove the extra material you have left for this purpose. As a rule I always leave a little for finishing now and don’t rely on Adaptive to do this.
Here is the step down that works for this one. Set it to be the same as the roughing depth at .55″ and this is what you get.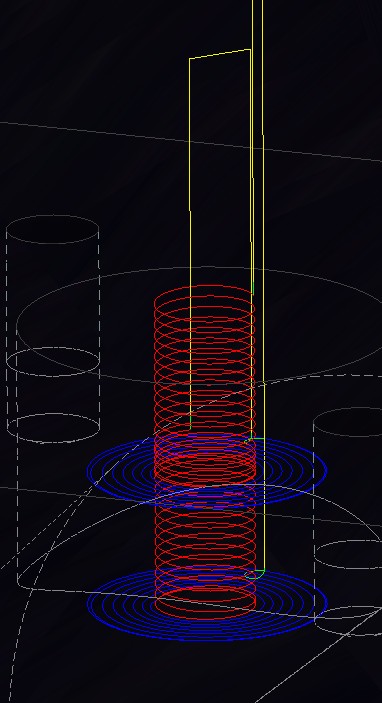
Perhaps this is a bad habit of mine but with ZW3D and CW4SE and HSM I tend to find that the 3D strategies seem to deal with the part structures better and so most of the time even though the cut is technically a 2D cut I opt for the 3D.
So what exactly do you fellow users do in similar situations? Please remember that I do not represent myself as an expert. What I am is a guy who has his own shop and does his own design, fabrication and machining. This quite often does not leave a whole lot of time for experimentation and sometimes information on how to best do things is elusive especially when there are no comprehensive user manuals.(cough cough hint hint HSM) . What I also am is someone who seeks better answers from those who also cut and part of the reason I post is that I hope others will chime in with what they do and why. Besides talking about what is going on with CAM and CAD programs I also want to post information on how to do these things. All of you look for answers but very few are willing to speak up about what they do and why. Perhaps you might reconsider and share some things here. This Blog is open to you and also to worthwhile links to your material if you have some we should know about.
In Addition.
Larry has posted a comment I will respond to.

He references being able to do this in one toolpath in CAMWorks and you can do the same in HSM with the bore cycle. Read the comments for why I chose two tool paths on this hole. One of the premises of Adaptive or Volumill type toolpaths is the ability to use full flute length thus increasing the amount of metal removed per tool over it’s usable life. I could have easily cut this with one step down to full depth rather than two. I neglected to show this in the tool path as an oversight not because I will be cutting it this way in production.

HI Dave,
I would use a helical contour move. In camworks you could set this up as one op if you put a finish depth in the op. Don’t forget to have it clean up the bottom of the spiral.
Hi Larry,
The hole is 1.5″ and I am using a .5 end mill. This is why I did the Adaptive, or in your case the Volumill, tool path for roughing. But you bet the helical down is generally what I use for finishing or counterbore holes with the cleanup as you say.
You can use an HSM Bore Cycle with a .5″ endmill in HSM that will allow stepovers so I could have two bore down to bottom and one finish path with this and stay within one tool path for cutting and finishing. On this part though rather than wear out the the end of the endmill faster doing two bore down cycles I would do the Adaptive and mill out then finish with the bore cycle. It takes maybe four minutes to create the extra tool path to finish and I can live with that.
In Addition here to.
OK just for the heck of it I went and timed the creation of a new bore finish tool path. If I reuse the .5″ tool in the library it takes less than a minute. If I have to create the tool from scratch it takes under two minutes.
I see what you are doing, just one spiral down and then full utilization of the length of the tool to bore out of the hole. I tried Volumill here and it did a toolpath but is wasn’t as efficient as the one you show. I saw something on the Volumill website where they have improved that but I don’t know if it has filtered back to CAMWorks yet. I’m one upgrade behind right now.
That is correct. It has been over a year since I did a cut like this in Volumill so I don’t remember. From what I saw with a brief look at CW4SE this year is far better than last year but it is not cheap to catch up. Go to the Helical end mills site and they have a milling advisor besides the one they make for Volumill. Download it and the end mill catalogue because you will need part numbers to make it work right. They explain about depth of cut and the feeds and speeds are pretty amazing. The HSM guys say run it just like Helical says and don’t worry.
What you saw has been my conclusion also. Same part, same speeds feeds and stepover and depth of cut and Volumill never won the race here.
Is that your part on the bike and is that you riding?
Yes and yes! I broke the metacarpal bone for my left thumb this summer so I am feeling like maybe I don’t want to break any other bones. I’m fixing up an old push-rod 50cc Honda to race at a much safer speed.